
What is GLOW?
GLOW is Williams’ Course Management System. (glow.williams.edu) It’s a web-based and easy to use platform that supports instructors in their teaching and communication with students. GLOW provides a suite of tools that makes it easy to put course materials online, including video and audio. It can also help faculty engage with students in a variety of ways including discussion forums, the online scheduling (Signup Sheets) of office hours and lab experiments, and the assignment collection and grading of quizzes and homework to name a few.
-
Faculty
-
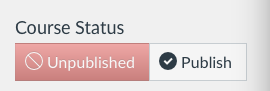
The home page of your course will indicate that it is unpublished and have a button for publishing to make the course available for students. Click the Publish button under “Course Status” in the upper right hand corner of the page. Students cannot see your course and content until you publish it.
-
The file repository indicates that files are locked (unavailable to students) when the icon for the file has a padlock on it. There is a lock icon in the settings that can toggle the lock status of the file. Content areas in Glow can be made to be available or unavailable to students even after a course is published. To the right of modules, pages, or other content will be an icon in the shape of a cloud. If the cloud is a light grey color, then the content is unavailable to students. You can click on the cloud to toggle the availability. When the cloud is green, the content item will be available to students. In the case of modules, you will want to make sure that the parent module is available to students as well as the content items listed in that module. Both the cloud for the parent module and the content items in the module will need to be the color green.
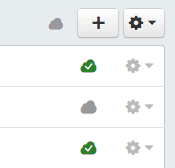
Green clouds indicate that course items are visible to students. Grey clouds indicate that content is not visible to students. In addition, there is a files repository. You can use Settings > Navigation to hide menu items from students including the Files menu item. When students view the course, the Files menu item would not be present. This effectively hides all the files in the file repository. You could then selectively share files by linking to files from a page or module.
However, there is also the option of keeping the Files menu item accessible to students, but controlling what students can see or access. When you hover over an item you can see icons for a padlock, pencil, and trash can. Clicking on the padlock icon will allow you to lock the file and make it unavailable to students. You can also make the file invisible to students. The file icon will appear to have a lock on it if you select either of these options.

In the settings area, you can click on the student view icon in the upper right hand corner. This will allow you to see the course with a student view and verify if students can or cannot see various course items and components. Once you have uploaded content and made it available or unavailable to students, you can check on your work but going to Settings and using the Student View button in the upper right hand corner. This will allow you to explore the course and see the course as it will appear to students. Click on the File menu item and test the accessibility of the files there. Also look at any modules or pages you have added and see if you can see them. To exit student view, there is a blue button in the lower right hand corner that says "leave student view."
-
-
Modules

Click to view full size. Modules (default course Home Page) are used to organize course content by topics, weeks, units, or a different organizational structure. Modules essentially create a one-directional linear flow of what students should do in a course.
Each module can contain files, Discussions, Assignments, Quizzes, links and other learning materials. You can add existing content (e.g. Assignments) or create a new entry (e.g. Page or Discussion forum) within the modules. Modules can be easily organized using the drag and drop feature. Elements within the modules can also be reorganized by dragging and dropping.
Here is how to post your syllabus file as a Module item.
Also read:
spacer-white text
You can also use the Syllabus Page or a Page to post your syllabus as shown below.
Syllabus Page
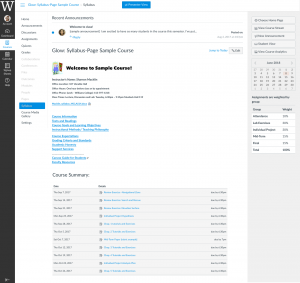
Click to view full size. When you use the Syllabus Page, “Course Summary” is automatically generated based on Assignments and Events within a course. The “Course Summary” can only be changed by editing or deleting the Assignments or Events. All Assignments (unpublished and published) are listed in the Syllabus Page for instructors, but students can only see published items. The Syllabus Page makes it easy to communicate to your students what will be required of them throughout the course in chronological order.
In addition, you can insert text, links, images, videos and audio above the “Course Summary” section.
Here is how to upload your syllabus to the Syllabus Page.
Also read:
Front Page
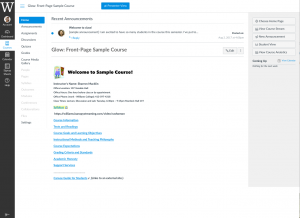
Click to view full size. You can design your course home page (Front Page) with text, images, media, and links. The links can be to files (e.g. syllabus in PDF or PowerPoint lecture), other Glow Pages, Discussions, Quizzes, and external content.
Here is how to upload your syllabus to a Glow Page.
Also read:
-
Enrolling non-Williams Users to Your Course
If you want to enroll non-Williams user(s) into your course, you will need to request an auditor (guest) account. Please fill out this form at:
http://hr.williams.edu/forms/williams-affiliation-request-form/
You will need their full name including middle initial, address and phone number. If you know that they ever had a Williams account, select “Renewal” for Affiliation Status on the request form instead of “New.”
After the auditor account is created (or renewed), you can enroll him/her the same way as you enroll those who have Williams username as described below.
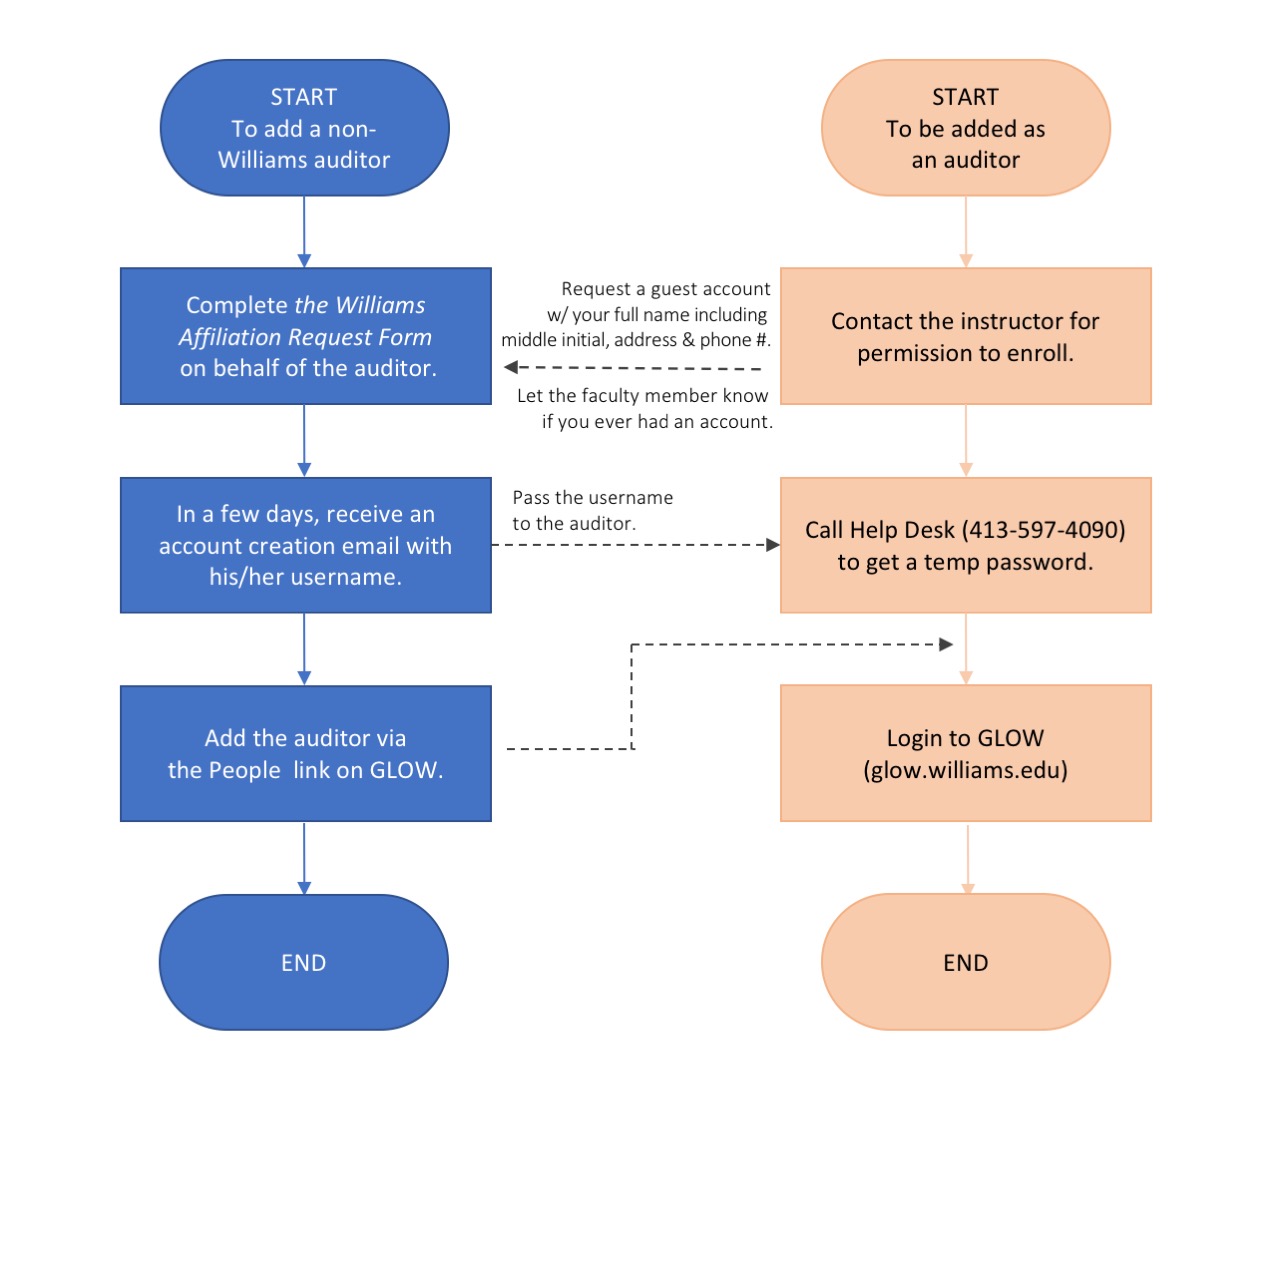
Enrolling/Removing Students, TAs & Auditors to/from Your Course
Officially registered students are automatically enrolled into your corresponding Glow course and you do not need to add any students. However, you can invite other students to join your course via People link.
Use Unix ID or Williams short-style email addresses (e.g. jfs1@williams.edu, not John.F.Smith@williams.edu) to find the student in the system .
– How do I add students and TAs to my course?
– How do I remove a student from my course?
A: Please email its@williams.edu with the name of the studentThere are six predefined roles:
- Teacher: Teacher can add content items, grade students, add users and change some course default settings.
- TA: TA has almost the same rights as a Teacher, but can NOT view nor edit grades.
- Grading TA: Special TA who has access to the Gradebook, Assignments, and Discussions, but NO editing rights.
- Grader-Homework: Special TA who only have access to the Gradebook and Assignments. NO editing rights.
- Student: That’s self-explanatory, they generally have fewer privileges within a course.
- Designer: By default, the Designer cannot edit grades, nor add/remove users. They can edit course content. Generally speaking, the Designer Role is best suited for the instructional designers or curriculum writers who write and manage course content.
- Observer: The Observer role can be used to enroll auditors and guests who would like to participate in a Glow course but do not need to earn course credit. Observers have limited permissions that allow them to see what is going on in a course without interrupting the flow of daily course communication.
-
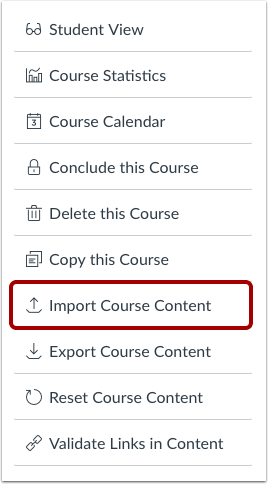
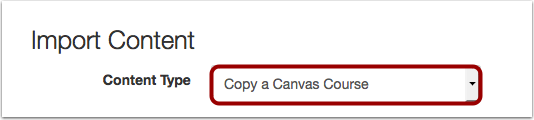
To copy course content, assignments, and quizzes from previous semesters, use the Course Import Tool from the Course Settings.
1. Go to your new course, then in Course Navigation, click the Settings link.
2. Click the Import Content Content button on the right.
3. Select Content Type
4. Search for a Course

5. Select Migration Content

To import all content from the course, select the All Content radio button.
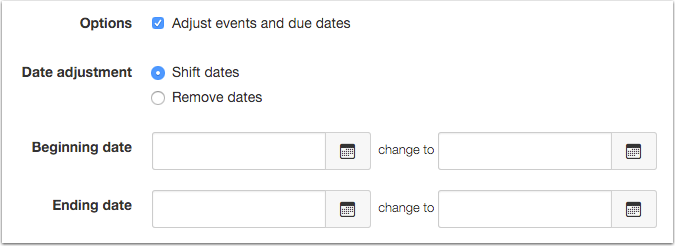
If you want to select specific content, click the Select specific content radio button.6. (optional) Adjust Events and Due Dates
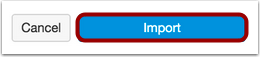
7. Click the Import button.
Q: How do I request library DVDs to be streamed in my course?
Students
-
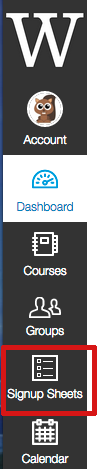
1. Click the Signup Sheets link.
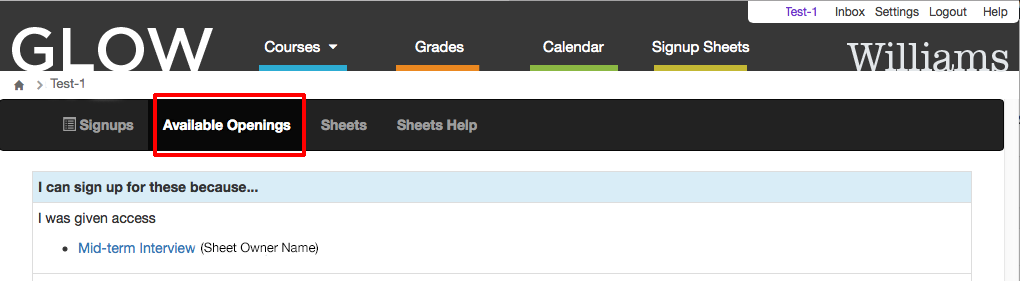
2. Click the Available Openings link.
3. Select the correct signup sheet. You will see a calendar showing all openings for the sheet. Hover over an openings icon and click Signup to add yourself. (You can remove yourself by clicking on the red X later if you needed.)
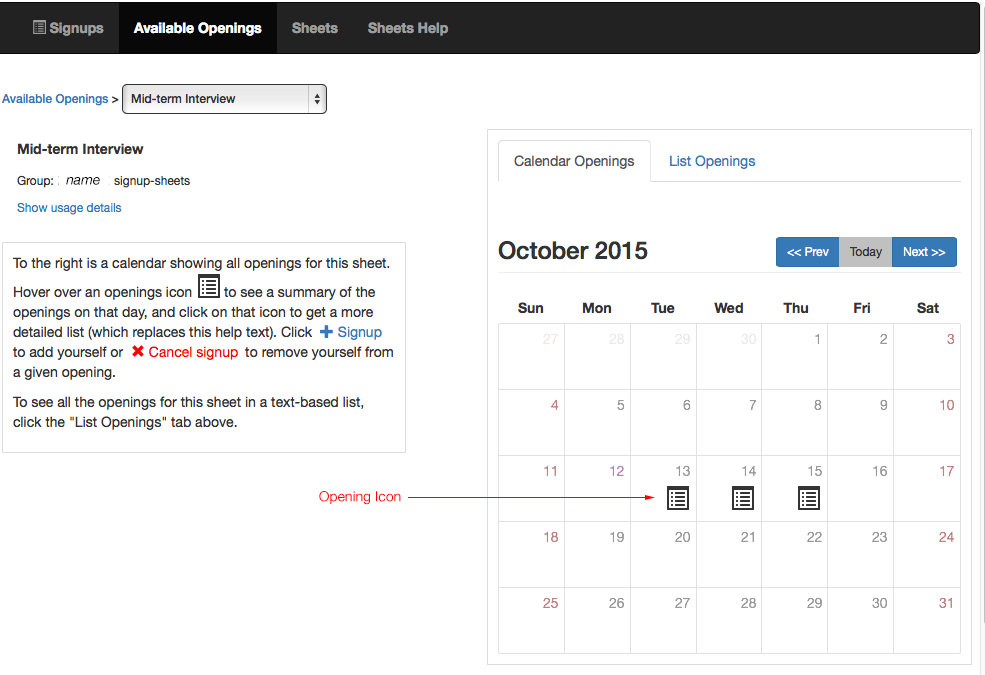
To see all the openings for this sheet in a text-based list, click the “List Openings” tab.

-
-
-
This page provides a how-to guide and an introduction to the key concepts of Glow to help instructors get started.
The same content is also available as a downloadable pdf file getting-started.
Log in
You can login to the Glow service at http://glow.williams.edu. You should use your regular Williams username (e.g. abc1) and password.
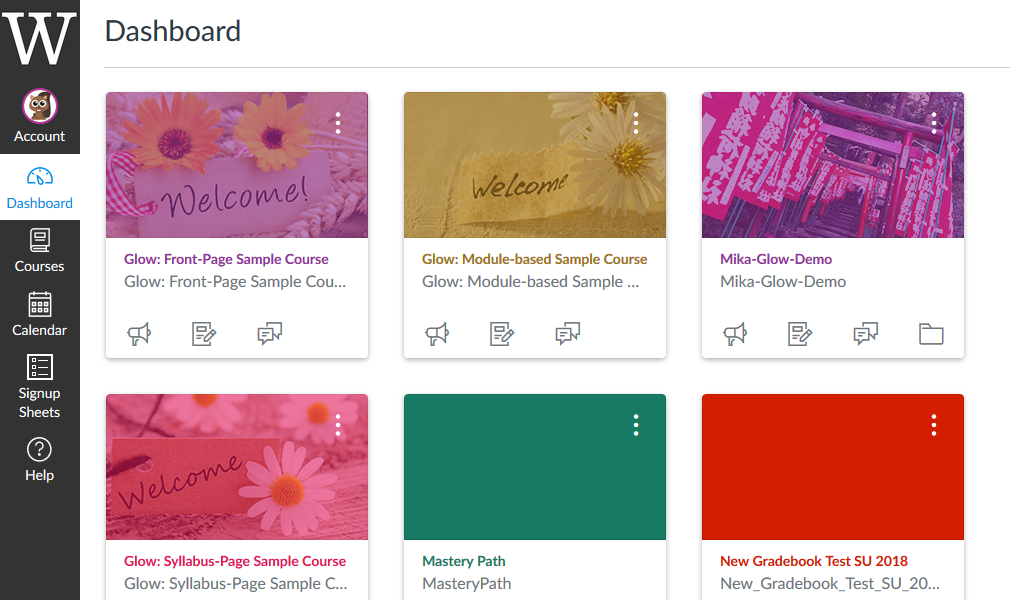
Dashboard
The Dashboard is the first thing you will see when you log into Glow.
Introduction to the GLOW Interface
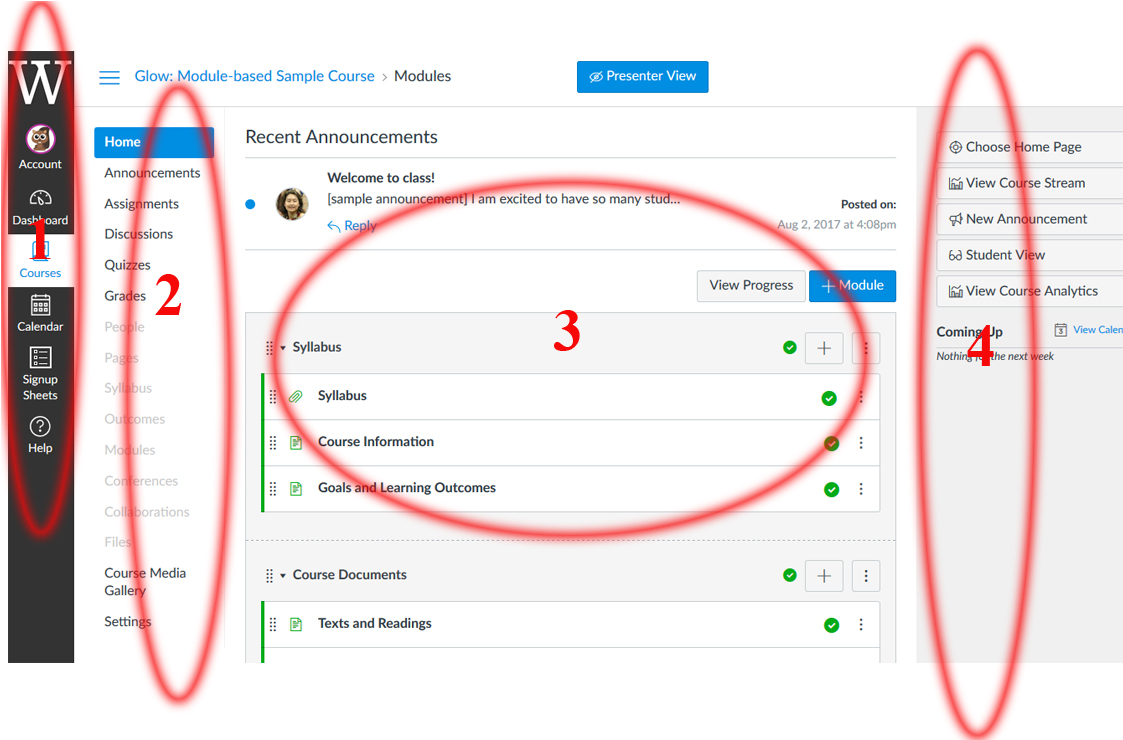
Your course(s) is under “Courses” [1]
1. Global Navigation: The links of the global navigation menu at the top of the page access features that are shared by all the courses on Glow you are enrolled in. This menu stays the same no matter what page you are looking at.
2. Course Navigation: The course navigation links provide access to features within the current course.When each course is first created on Glow, by default it will have fourteen areas linked to in the course navigation (Announcements, Assignments, Discussions, Grades, People, Pages, Files, Syllabus, Outcomes, Quizzes, Modules, Conferences, Collaborations, Settings). As an instructor, you can customize what links are shown in your course and hide from students those that you don’t need in your course.
3. Course Content Area: This is where your course content is displayed
4. Sidebar (context sensitive): The sidebar shows the features available on the page you are currently looking at. The sidebar will change as you go to different pages within your course.
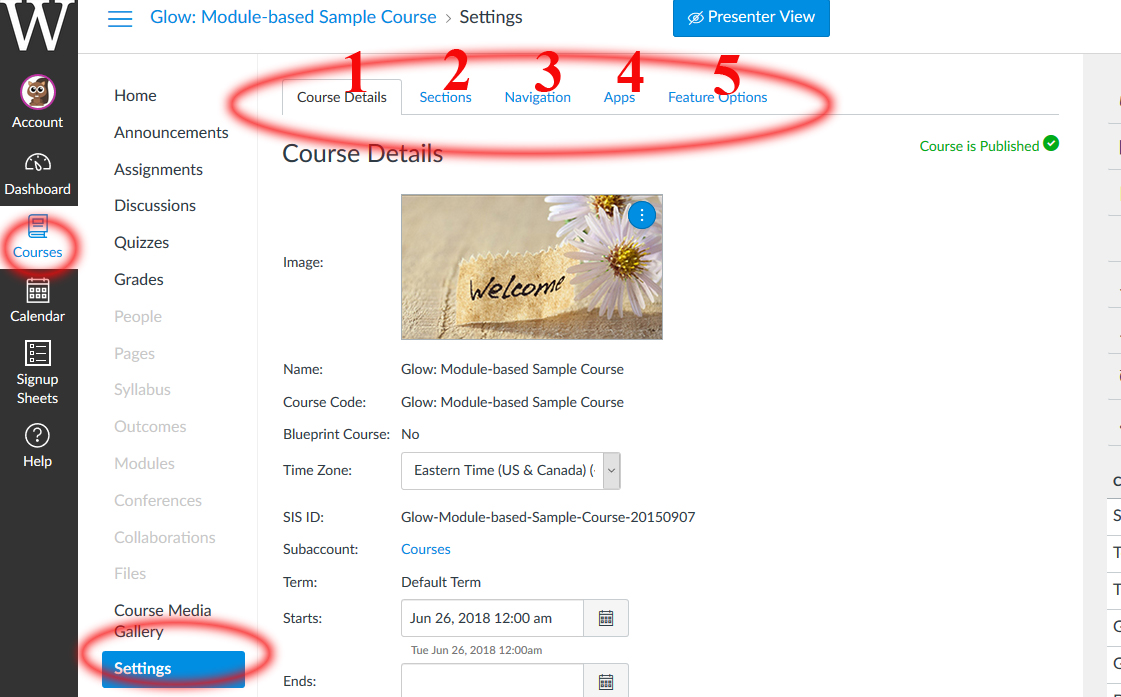
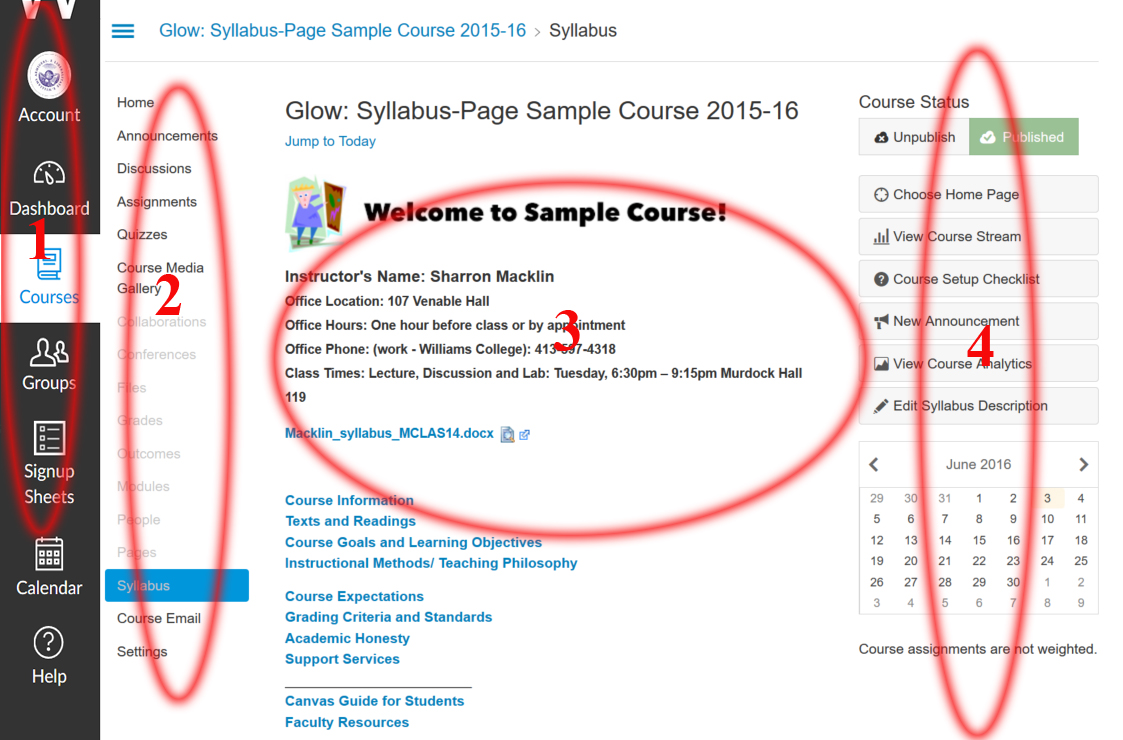
GLOW Course Settings
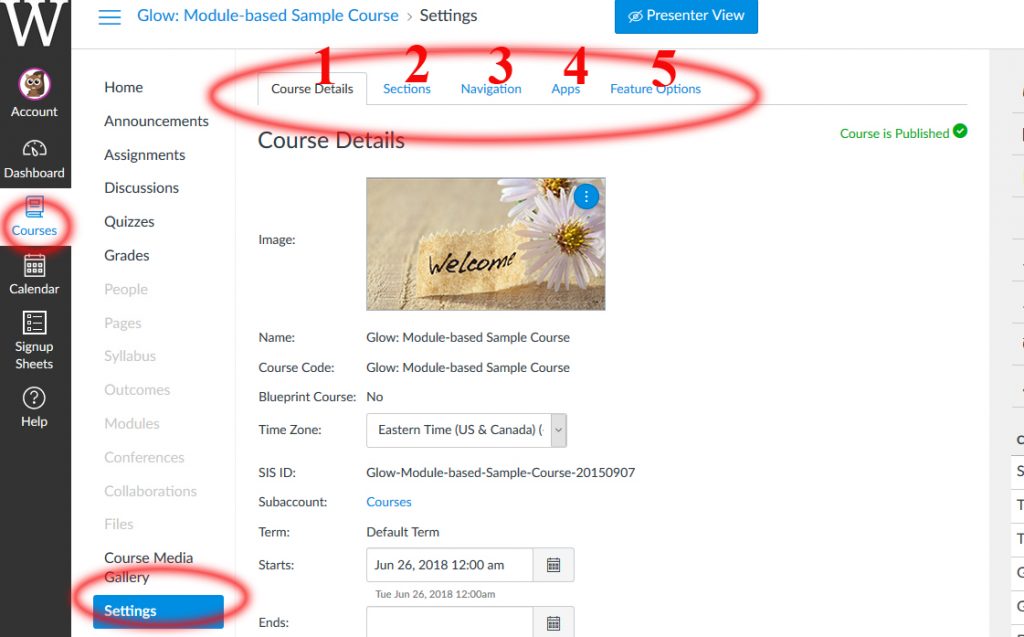
The “Settings” button within the course navigation menu on the left of the screen is where you can view or update the details of your course settings and its sections. You can also configure what will be available to students in the course navigation menu.
1. Course Details: The details of the course, including its name. These should generally be left as the default, although this is also the place to set your course interface to use a non-English language.
2. Sections: You can manage the different sections of your course and their enrollments, and the people associated with your course and their role. It also has a tool that allows you to consolidate enrollments of cross-listed courses into one. Please consult with your Itech Liaison if this is the first time you’re making changes to the sections of a course.
3. Navigation: You can modify the Course Navigation menu listed of your course. You can hide specific links from students, and drag and drop links to change their order. Links that appear to the instructor as greyed out will be hidden to students.
4. Apps: The Apps tab allows you to view and activate a list of additional tools that are available for use in Glow. Additional documentation of these tools will be coming soon.
5. Feature Options: The Feature Options tab allows you to enable and disable Glow features within a particular course.
GLOW Personal Account Settings
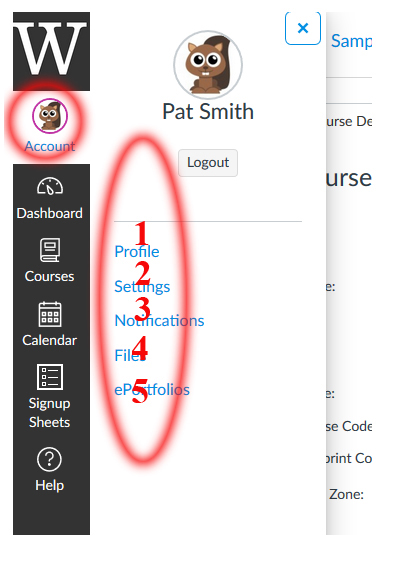
1. Profile: Where you can change your profile picture (Avatar) and your display name.
2. Notifications: You can configure how you will receive notifications from Glow, e.g. do you want to be notified when a student submits an assignement, how frequently, etc?
3. Files: Files can be uploaded to a specific course, or to your personal file repository where they will be available to use in multiple courses. The files link is where you upload and manage your files in your personal file repository.
4. Settings: You can tie Glow in with other web tools that you already use (e.g. Google Docs, Facebook etc). Click any of the services in “Other Services” for detail.
5. ePortfolios: This is a seldom used tool at Williams.
-
Course Setup
First time using Glow
-
This page provides a how-to guide and an introduction to the key concepts of Glow to help instructors get started.
The same content is also available as a downloadable pdf file getting-started.
Log in
You can login to the Glow service at http://glow.williams.edu. You should use your regular Williams username (e.g. abc1) and password.
Dashboard
The Dashboard is the first thing you will see when you log into Glow.
Introduction to the GLOW Interface
Your course(s) is under “Courses” [1]
1. Global Navigation: The links of the global navigation menu at the top of the page access features that are shared by all the courses on Glow you are enrolled in. This menu stays the same no matter what page you are looking at.
2. Course Navigation: The course navigation links provide access to features within the current course.When each course is first created on Glow, by default it will have fourteen areas linked to in the course navigation (Announcements, Assignments, Discussions, Grades, People, Pages, Files, Syllabus, Outcomes, Quizzes, Modules, Conferences, Collaborations, Settings). As an instructor, you can customize what links are shown in your course and hide from students those that you don’t need in your course.
3. Course Content Area: This is where your course content is displayed
4. Sidebar (context sensitive): The sidebar shows the features available on the page you are currently looking at. The sidebar will change as you go to different pages within your course.
GLOW Course Settings
The “Settings” button within the course navigation menu on the left of the screen is where you can view or update the details of your course settings and its sections. You can also configure what will be available to students in the course navigation menu.
1. Course Details: The details of the course, including its name. These should generally be left as the default, although this is also the place to set your course interface to use a non-English language.
2. Sections: You can manage the different sections of your course and their enrollments, and the people associated with your course and their role. It also has a tool that allows you to consolidate enrollments of cross-listed courses into one. Please consult with your Itech Liaison if this is the first time you’re making changes to the sections of a course.
3. Navigation: You can modify the Course Navigation menu listed of your course. You can hide specific links from students, and drag and drop links to change their order. Links that appear to the instructor as greyed out will be hidden to students.
4. Apps: The Apps tab allows you to view and activate a list of additional tools that are available for use in Glow. Additional documentation of these tools will be coming soon.
5. Feature Options: The Feature Options tab allows you to enable and disable Glow features within a particular course.
GLOW Personal Account Settings
1. Profile: Where you can change your profile picture (Avatar) and your display name.
2. Notifications: You can configure how you will receive notifications from Glow, e.g. do you want to be notified when a student submits an assignement, how frequently, etc?
3. Files: Files can be uploaded to a specific course, or to your personal file repository where they will be available to use in multiple courses. The files link is where you upload and manage your files in your personal file repository.
4. Settings: You can tie Glow in with other web tools that you already use (e.g. Google Docs, Facebook etc). Click any of the services in “Other Services” for detail.
5. ePortfolios: This is a seldom used tool at Williams.
Q: How do I learn to use Glow? Is there an instructor manual?
Q: Are there any example courses? A: Yes!Setting up a course
Q: How do I add my course syllabus?
Q: How do I add readings, scanned documents, etc. to my course?
--- Syllabus Page
--- Front Page (More on Pages,
--- Modules (More on Modules,
Q: How do I merge multiple courses (sections) into a single course (section)?
Q: How do I upload files?
Q: How do I make a link to a website (using a page)?
Q: How do I make a link to a website (using a Module)?
Q: How can I customize navigation and default language?
Q: How do I change a landing page for my course?
Q: How do I make my course(s) available to my students?
Q: How do I make content available or unavailable to students?
Q: I published my course by mistake! How can I hide it again from students?
Q: How do I copy course material from one GLOW course to another?
Q: How can I view my course as my students do?
Q: How do I enroll & remove students, TAs, and auditors from my course?
Q: How can I customize the Notifications?
* Notes on Notifications for Discussions.Course Tools
Announcements
Q: How do I make an Announcement?
Q: How do I edit an Announcement?
Q: How do I delete an Announcement?
Q: How can I get Announcements through my email?
[More on Announcements ]Assignments
Q: What are Assignments?
Q: How do I add an Assignment?
Q: How do I build an Assignment to collect homework from my students online? (See "Select Submission Type" there.)
Q: Where can I find the homework my students submitted online?
Q: How do I weight the final course grade based on assignment groups?
[More on Assignments ]Calendar
Q: How do I use the Glow Calendar?
Q: How do I add an event to the course Calendar?
Q: How do I change the date of an Event or Assignment on the Calendar?
Q: How do I filter my Calendar view by course?
[More on Calendar ]Discussions
Q: How do I create a Discussion?
Q: How do I pin a Discussion on the Index Page?
Q: When would I use Threaded Discussions?
Q: How do I set up a graded Discussion?
Q: How do I subscribe to a Discussion?
Q: How do I set up a Group Discussion?
Q: Students aren't able to attach files to their Discussion posts. Help.
[More on Discussions ]Email
Q: How can I email my class using Course Email Tool?
Q: How can I customize the Notifications?File Management
Q: What are Files?
Q: Where are my personal Files?
Q: Where are my course Files?
Q: How do I add a file to my course?
Q: How do I bulk upload files?
Q: How do I create a folder in Files?
Q: How do I restrict files and folders to students?
Q: How do I set usage rights and user access for a course file?
Q: How do I set usage rights and user access for a course folder?
Q: How do I move and organize my files?
Q: How do I delete a file?
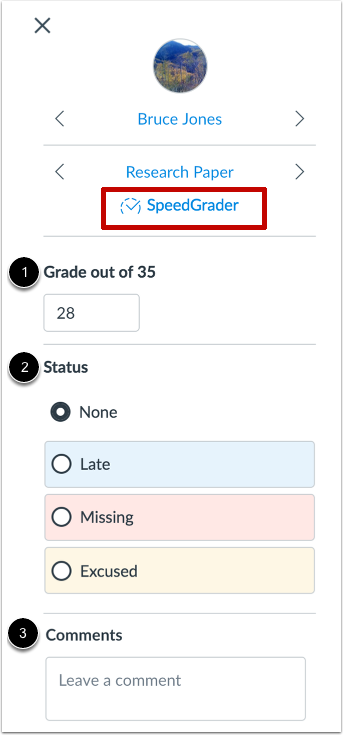
[More on Files ]Gradebook and the SpeedGrader
Q: What are Grades and the Gradebook?
Q: How do I hide totals in my students' grade summaries?
Q: How do I hide student names in the Gradebook?
Q: How do I sort columns my Gradebook?
Q: How do I view assignment details in the Gradebook?
Q: How do I weight final grades?
Q: What is the SpeedGrader and how do I use it?
Q: How do I get to SpeedGrader from an Assignment, Quiz, or graded Discussion?
Q: How do I leave feedback for my students in SpeedGrader?
[More on Grades and SpeedGrader ]LTI (External Apps)
Q: What is LTI?
Q: Which LTI's are currently available through GLOW?
Q: Where can I find External Apps to use in my course?The [course] Media Gallery
Q: I'm trying to access streaming media in Glow, but I see a blank screen. Help.
Q: How do I request library DVDs to be streamed in my course?
Q: Where are my streaming videos for my course?
Q: How do I upload files?
Q: How do I create a new folder?
Q: How do I manage my folders?
Q: How do I copy and move media files?
Q: How do I use the Panopto Recorder to capture my computer screen?
- Basic Recording for Mac
- Basic Recording for Windows
Q: How do I edit my video?
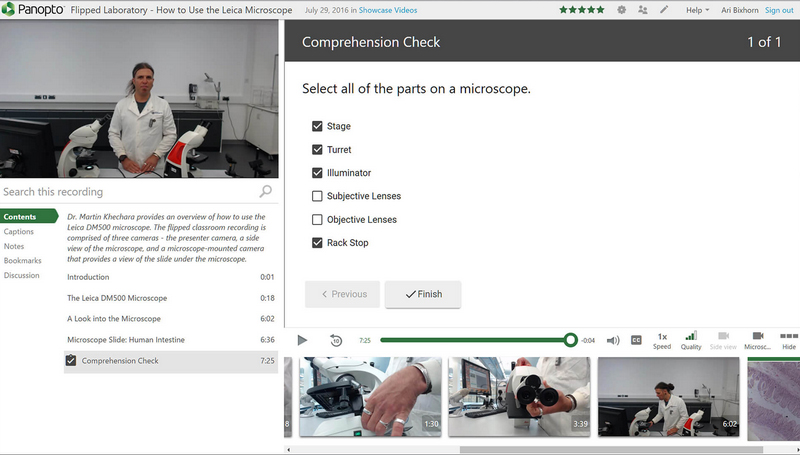
Q: How do I add a quiz for a video?
[More on Media Gallery or Panopto]Modules
Q: What are Modules and how do I create a new one?
Q: How do I add items (files, external links, external tools, etc.) to a Module?
Q: How do I reorder a Module and Module items?
Q: How do I delete a Module and Module items?
Q: How do I use Draft State in Modules? ?
[More on Modules ]Pages
Q: What are Pages? and how do I create a new one?
Q: How do I edit Pages?
Q: How do I delete Pages?
Q: How do I link to other Pages?
Q: How do I create a file link in a Page?
Q: How do I upload a PDF to a page in a course?
Q: How do I embed a video in a Page?
Q: How do I use Draft State in Pages?
[More on Pages ]People/Roles
Q: How do I access People?
Q: What are the differences among TA, Grading TA and Grader-Homework?
Q: How do I access the Face Book?
Q: I can't print the Face Book page. Help!
Q: How do I enroll & remove students, TAs, and auditors from my course?Quizzes
Q: What options are available for Quizzes?
Q: What types of quiz questions can I create?
Q: How do I create and view Survey?
Q: How do I create a Question Bank?
[More on Quizzes ]Rich Content Editor
Q: What is the Rich Content Editor?
Q: How do I embed images?
Q: How do I create a hyperlink?
Q: How do I link to a YouTube video?
Q: How do I remove formatting copied from another source in the Rich Content Editor?
Q: How do I insert a table using the Rich Content Editor?
Q: How do I record a video using the Rich Content Editor?
Q: How do I record audio using the Rich Content Editor?
Q: How do I use the Math Editor?
[More on Rich Content Editor ]Signup Sheets
Q: How do I create a new signup sheet?
Q: How do I delete and edit openings?
Q: How do I sign up others?
Q: How do I print a signup list?
Q: How do I delete a signup sheet that I created?
Q: How do my students sign up for openings?Syllabus
Q: How do I use the Syllabus page?
Q: How do I edit the Syllabus description?Additional Info
-
-
Q: How do I create a new folder?
Q: How do I manage my folders?
Q: How do I use the Panopto Recorder to capture my computer screen?
– Recording for Mac
– Recording for WindowsQ: How do I add a quiz to a video? (Watch a video tutorial.)
Q: How do I sync interactive video quizzes to the Gradebook in GLOW?
For more on Panopto, visit this page.
Q: How do I request library materials to be streamed in my course?
-
The New GLOW Gradebook
Click to view full size.
How do I use the new GLOW Gradebook?
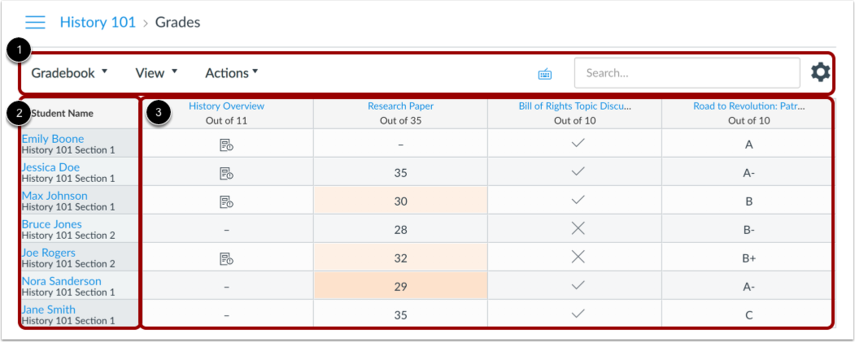
The top of the Gradebook includes global sorting options and settings you can use to organize your Gradebook [1], which will populate the selected student data [2] and assignment data [3].
-
The top of the Gradebook includes sorting options and settings you can use to organize your Gradebook [1], which will populate the select student data [2] and assignment data [3].
Gradebook Menu
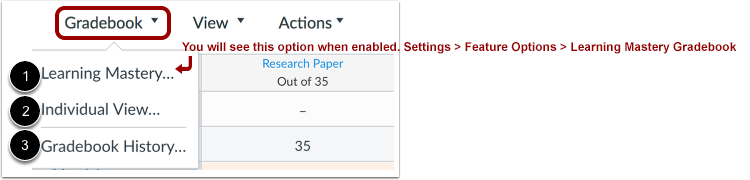
The main Gradebook allows you to see all students, assignments, and grades. In the Gradebook menu, you also switch between several options as available:
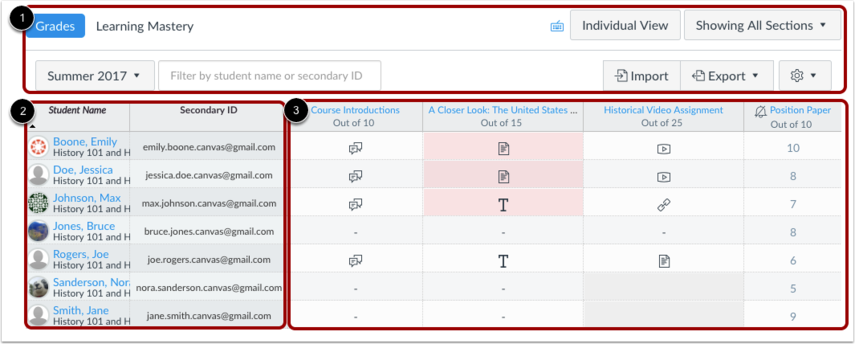
Learning Mastery [1] displays the Learning Mastery Gradebook, which assesses outcome standards being used in Canvas courses. This gradebook is a course-level feature option.
Individual View [2] allows you to assess one student and one assignment at a time and is fully accessible for screen readers. Individual View currently does not support settings and options from the New Gradebook.
Gradebook History [3] displays the Gradebook History page, which logs recent grade changes in the course according to student, grader, assignment, and date.
You can switch between gradebooks at any time.
Gradebook Viewing Options
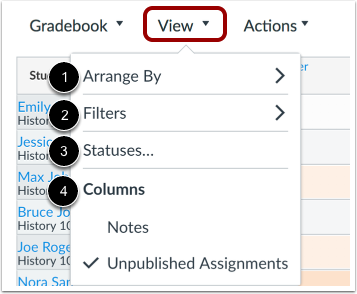
The View menu allows you to filter and sort the Gradebook according to several viewing options:
- Arrange By [1]: arrange columns by default, assignment name, due date, points, or module
- Filters [2]: filter columns by type (assignment group, section, modules, and grading period, if applicable)
- Statuses [3]: view and change the color for a grading status (late, missing, resubmitted, dropped, and excused)
- Columns [4]: show or hide the notes column and the unpublished assignments column
Gradebook Actions Menu
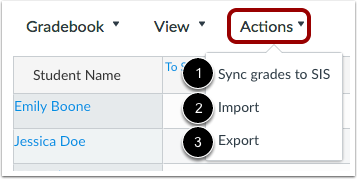
The Actions menu allows you to sync grades to your institution’s student information system (SIS), if applicable.
To bulk manage student grades in the Gradebook, you can also import grades [2] and export grades [3].
Note: Currently the Gradebook Export CSV file data includes all Gradebook data regardless of filtered or sorting options.
Gradebook Settings
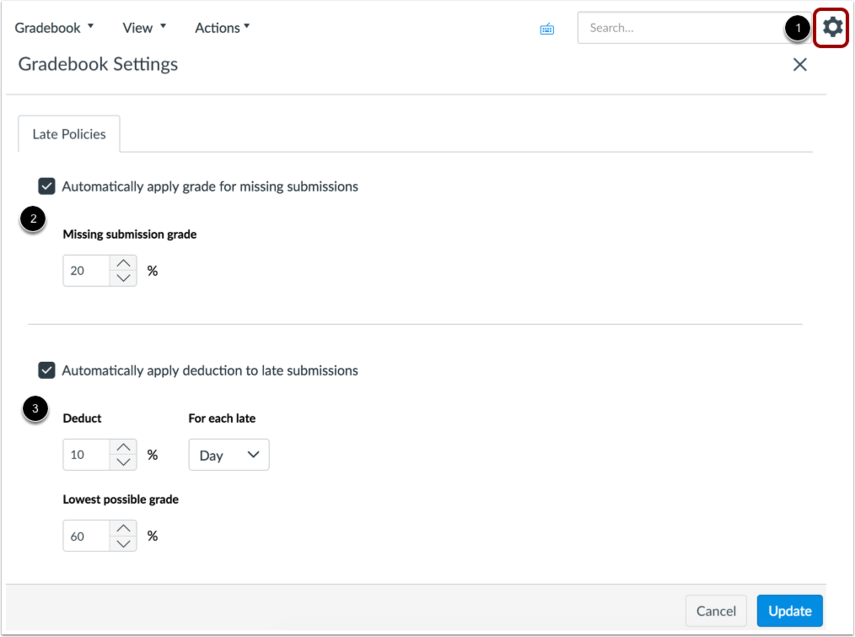
The Gradebook Settings allow you to apply late policies in your course [1].
The Missing Submission policy allows you to automatically apply a grade for submissions labeled as Missing [2]. A submission is labeled Missing when the due date has passed and the assignment has not been submitted.
The Late Submission policy allows you to automatically apply a defined penalty to submissions with a status of Late [3]. A submission is labeled Late when it is submitted past the due date. Additionally, you can define a threshold under which a student will not be scored, regardless of how late the submission is when submitted.
Enter Grades
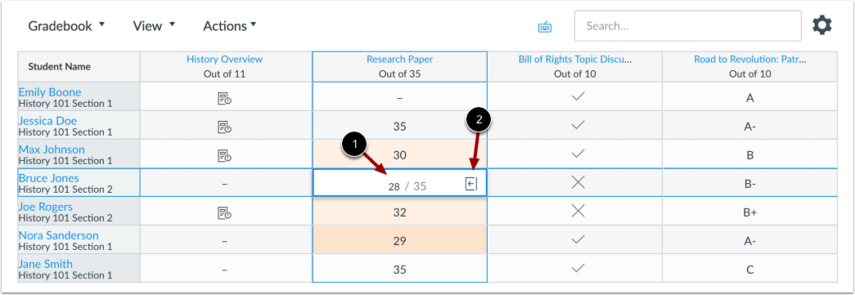
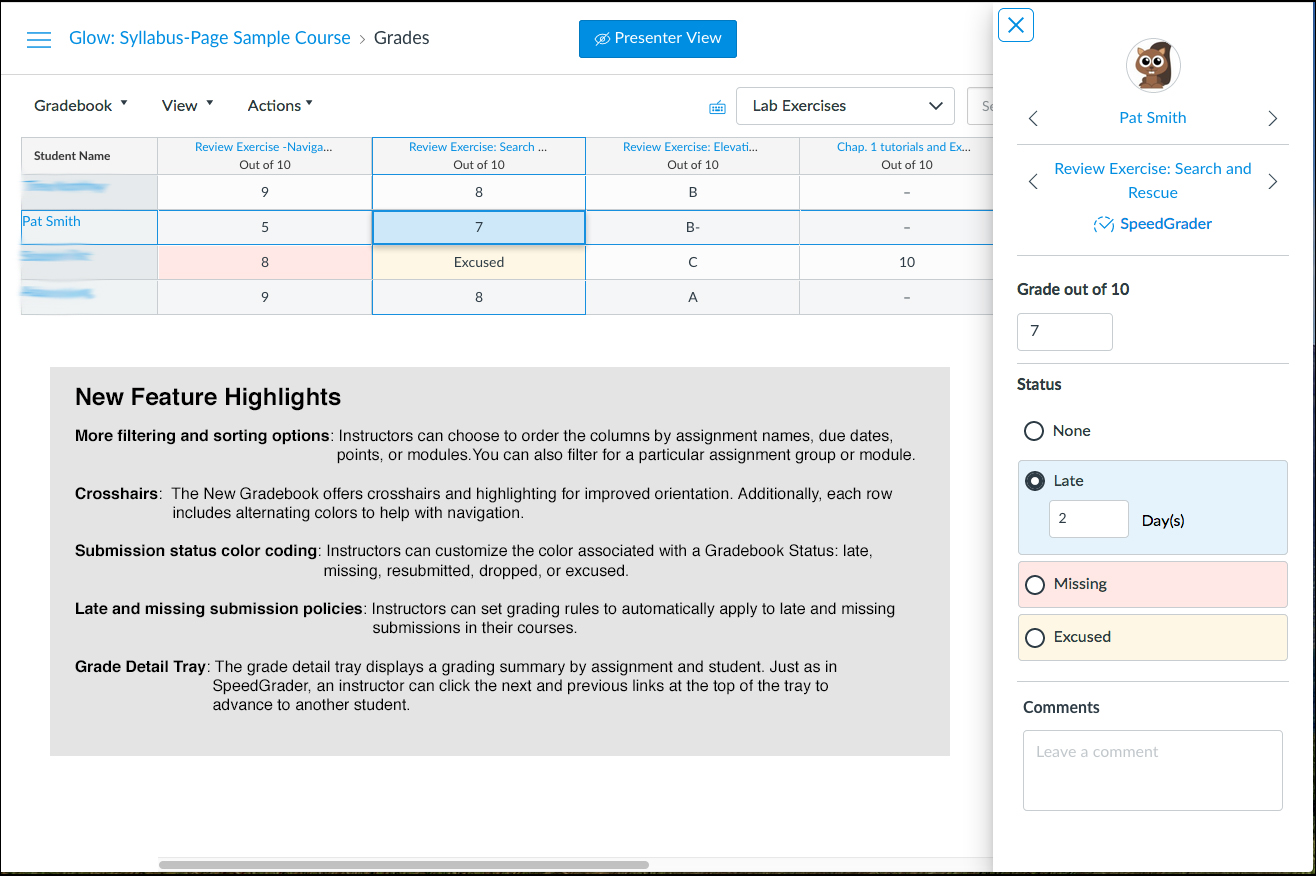
When entering grades, the New Gradebook displays crosshairs and highlighting across the row and column for improved orientation.
To enter grades, type the grade as supported by assignment type directly in the Gradebook cell [1].You can access SpeedGrader and also enter grades and change the submission status by clicking the Grade Detail Tray icon [2].
Grade Detail Tray -
-


